Back up WeekToDo to Appwrite
Add Appwrite sign in to the WeekToDo Vue planner and keep a private .wtdb backup in Appwrite Storage, using the same export format the app already ships.
WeekToDo is a free, open source weekly planner (GitHub, web app). It is Vue 3 with an optional Electron shell. Config lives in localStorage, tasks and recurring events live in IndexedDB (weekToDo), and the app is deliberately local first. "Sync across devices" is still on the roadmap, and users have asked for Appwrite specifically (issue #245).
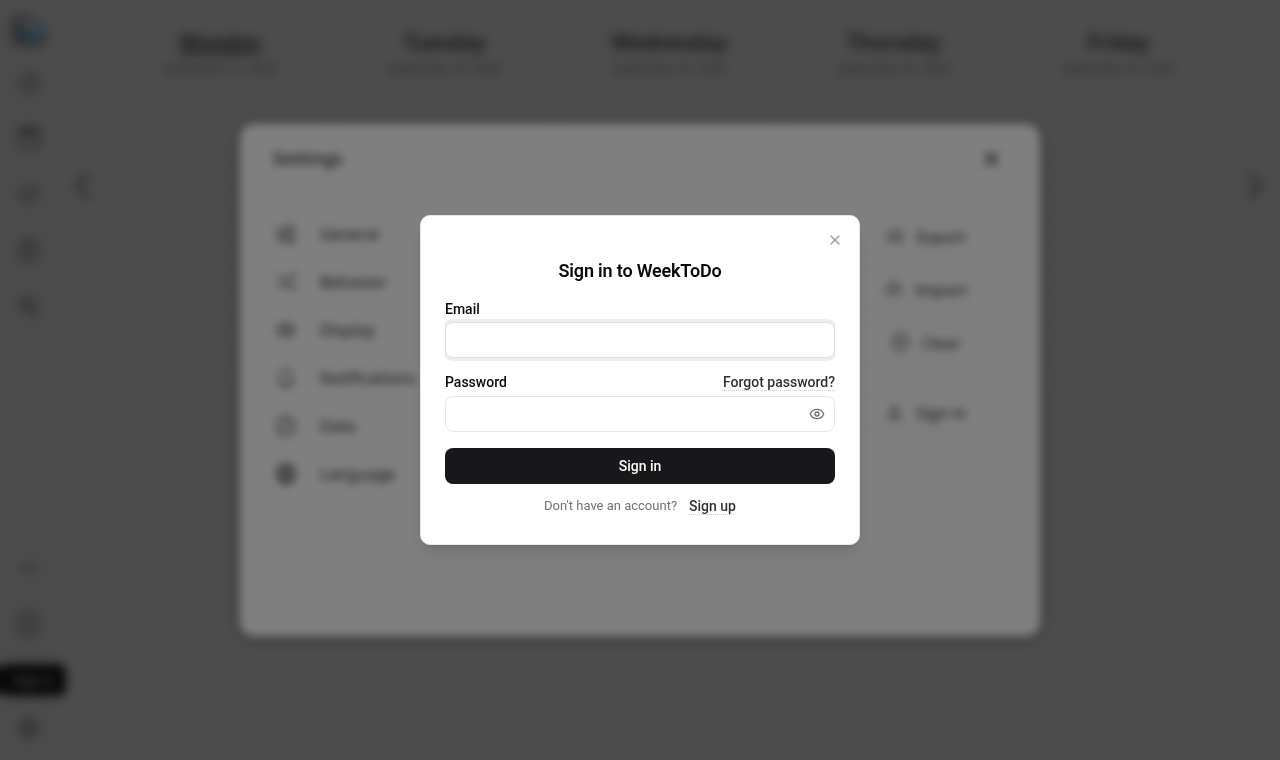
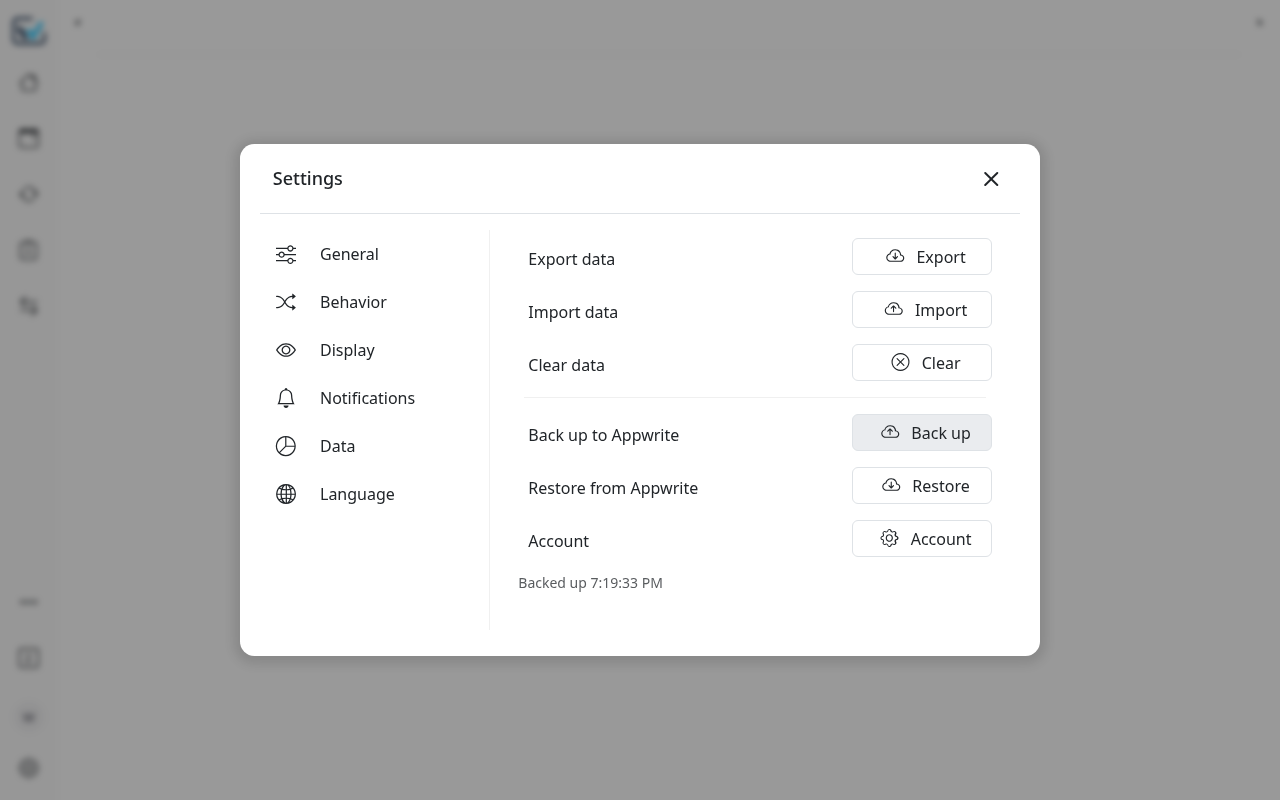
In this guide you add Auth UI for an optional cloud account, then put Back up and Restore next to the existing Export/Import buttons in Settings → Data. Backups reuse WeekToDo's own .wtdb JSON shape and land as a private file in Appwrite Storage. The planner keeps working offline with no account. Auth UI is only for the people who want a spare copy in the cloud.
Backups grow past the 64 KB that user preferences allow, which is why this guide uses Storage (same reason as the OpenHabitTracker guide). Preferences remain fine for tiny values, as in the 2048 guide.
Clone and run the web app
You need a recent Node.js and Yarn.
git clone https://github.com/manuelernestog/weektodo.git
cd weektodo
yarn install --ignore-engines
NODE_OPTIONS=--openssl-legacy-provider yarn serve
WeekToDo pins Webpack 4 and an older @achrinza/node-ipc engine range. On Node 18+ use --ignore-engines, and on Node 17+ set NODE_OPTIONS=--openssl-legacy-provider so Webpack's hash still works. Open the URL Vue CLI prints (usually http://localhost:8080). Prefer this web build for Auth UI. Electron notes are at the end.
Create an Appwrite project and a bucket
- Create a project on Appwrite Cloud or your own instance and add a Web platform with hostname
localhost. - Under Storage, create a bucket with the ID
backups. - In the bucket's Settings, enable File security and add a permission that lets the Users role create files. Each backup will carry its own read, update and delete permissions for the user who owns it.
Note the project ID and API endpoint from the Console, for example https://fra.cloud.appwrite.io/v1.
Install Auth UI
WeekToDo already has a Yarn build, so install the package and its peers:
yarn add @getauthui/core@0.1.45 appwrite lit --ignore-enginesAuth UI, Lit and the Appwrite Web SDK ship modern syntax (??, and so on). Vue CLI 4 does not transpile node_modules by default, so teach Webpack about those packages and tell vue-loader that authui-* tags are custom elements (WeekToDo uses the runtime-only Vue build, so app.config.compilerOptions.isCustomElement in main.js is ignored):
module.exports = {
  transpileDependencies: [
    "@getauthui/core",
    "lit",
    "@lit",
    "@lit/reactive-element",
    "lit-element",
    "lit-html",
    "appwrite",
  ],
  chainWebpack: (config) => {
    config.module
      .rule("vue")
      .use("vue-loader")
      .tap((options) => {
        options.compilerOptions = options.compilerOptions || {};
        options.compilerOptions.isCustomElement = (tag) => tag.startsWith("authui-");
        return options;
      });
  },
  // ... keep the existing pluginOptions.electronBuilder block ...
};
Merge those keys into the existing module.exports rather than replacing the Electron options.
Load critical CSS and configure Auth UI
Put the FOUC guard in public/index.html inside <head> so sign-in slots stay hidden until the custom elements upgrade:
<link rel="stylesheet" href="https://unpkg.com/@getauthui/core@0.1.45/dist/fouc.css" />Then initialize Auth UI once in src/main.js, before you mount the app:
import { createApp } from "vue";
import App from "./App.vue";
import { store } from "./store/store";
import { AuthUI } from "@getauthui/core";
import "@getauthui/core";

AuthUI.init({
  endpoint: "https://fra.cloud.appwrite.io/v1",
  project: "YOUR_PROJECT_ID",
  methods: { emailPassword: true },
  branding: { name: "WeekToDo" },
});

// ... existing i18n, bootstrap, Sentry setup ...

const app = createApp(App);
app.use(store);
app.use(i18n);
app.mount("#app");
import "@getauthui/core" registers the custom elements. AuthUI.init configures the shared store. Custom-element handling lives in vue.config.js from the previous step (runtime-only Vue ignores app.config.compilerOptions). Replace the endpoint and project ID with yours.
Snapshot helpers that match Export/Import
WeekToDo already builds a full backup in src/helpers/exportTool.js: localStorage keys plus every row from the IndexedDB stores todo_lists, repeating_events and repeating_events_by_date. Create src/helpers/appwriteBackup.js that returns the same object as a Promise, then uploads or restores it through Auth UI's client.
import { AuthUI, appwrite } from "@getauthui/core";
import storageRepository from "../repositories/storageRepository";
import dbRepository from "../repositories/dbRepository";

const { Storage, Permission, Role } = appwrite;
const BUCKET = "backups";

function readStore(db, table) {
  return new Promise((resolve, reject) => {
    const out = {};
    const request = dbRepository.selectAll(db, table);
    request.onsuccess = () => {
      const cursor = request.result;
      if (cursor) {
        out[cursor.key] = cursor.value;
        cursor.continue();
      } else {
        resolve(out);
      }
    };
    request.onerror = () => reject(request.error);
  });
}

export function snapshot() {
  return new Promise((resolve, reject) => {
    const data = storageRepository.as_json();
    const dbReq = dbRepository.open();
    dbReq.onerror = () => reject(dbReq.error);
    dbReq.onsuccess = async (event) => {
      try {
        const db = event.target.result;
        data.todoLists = await readStore(db, "todo_lists");
        data.repeating_events = await readStore(db, "repeating_events");
        data.repeating_events_by_date = await readStore(db, "repeating_events_by_date");
        data.savedAt = Date.now();
        resolve(data);
      } catch (err) {
        reject(err);
      }
    };
  });
}

export async function uploadBackup() {
  const storage = new Storage(AuthUI.getClient());
  const userId = AuthUI.getUser().$id;
  const json = JSON.stringify(await snapshot());
  const file = new File([json], "WeekToDoBackup.wtdb", { type: "application/json" });
  const permissions = [
    Permission.read(Role.user(userId)),
    Permission.update(Role.user(userId)),
    Permission.delete(Role.user(userId)),
  ];

  try {
    await storage.deleteFile(BUCKET, userId);
  } catch {
    /* first backup */
  }
  await storage.createFile(BUCKET, userId, file, permissions);
}

export async function downloadBackup() {
  const storage = new Storage(AuthUI.getClient());
  const userId = AuthUI.getUser().$id;
  // Prefer the SDK download URL + fetch so we always get the raw .wtdb JSON body.
  // Client.call defaults to JSON parsing too, but fetch matches WeekToDo's file import path.
  const url = storage.getFileDownload(BUCKET, userId);
  const res = await fetch(url, { credentials: "include" });
  if (!res.ok) throw new Error(`Restore failed (${res.status})`);
  return res.json();
}
appwrite is the Appwrite Web SDK re-exported by Auth UI, so the page loads it once. AuthUI.getClient() is the signed-in client. See createFile and permissions.
Add Back up and Restore to Settings → Data
Open src/views/configModal.vue. In the #config-data pane, after the Export / Import / Clear rows, add a cloud section that only appears once Auth UI knows the session:
<div class="horizontal-divider my-3"></div>

<authui-show when="signed-out">
  <div class="form-check form-switch d-flex px-1 mb-3 justify-content-between align-items-center">
    <label class="form-check-label" for="sign-in-sync-btn">Sign in to back up</label>
    <button
      id="sign-in-sync-btn"
      type="button"
      class="btn py-1 px-2 border"
      style="width: 140px;"
      @click="openSignIn"
    >
      <i class="icons bi-person mx-2"></i>
      Sign in
    </button>
  </div>
</authui-show>

<authui-show when="signed-in">
  <div class="form-check form-switch d-flex px-1 mb-3 justify-content-between align-items-center">
    <label class="form-check-label" for="backup-data-btn">Back up to Appwrite</label>
    <button
      id="backup-data-btn"
      type="button"
      class="btn py-1 px-2 border"
      style="width: 140px;"
      :disabled="busy"
      @click="backUp"
    >
      <i class="icons bi-cloud-arrow-up mx-2"></i>
      Back up
    </button>
  </div>
  <div class="form-check form-switch d-flex px-1 mb-3 justify-content-between align-items-center">
    <label class="form-check-label" for="restore-data-btn">Restore from Appwrite</label>
    <button
      id="restore-data-btn"
      type="button"
      class="btn py-1 px-2 border"
      style="width: 140px;"
      :disabled="busy"
      @click="restore"
    >
      <i class="icons bi-cloud-arrow-down mx-2"></i>
      Restore
    </button>
  </div>
  <div class="form-check form-switch d-flex px-1 mb-3 justify-content-between align-items-center">
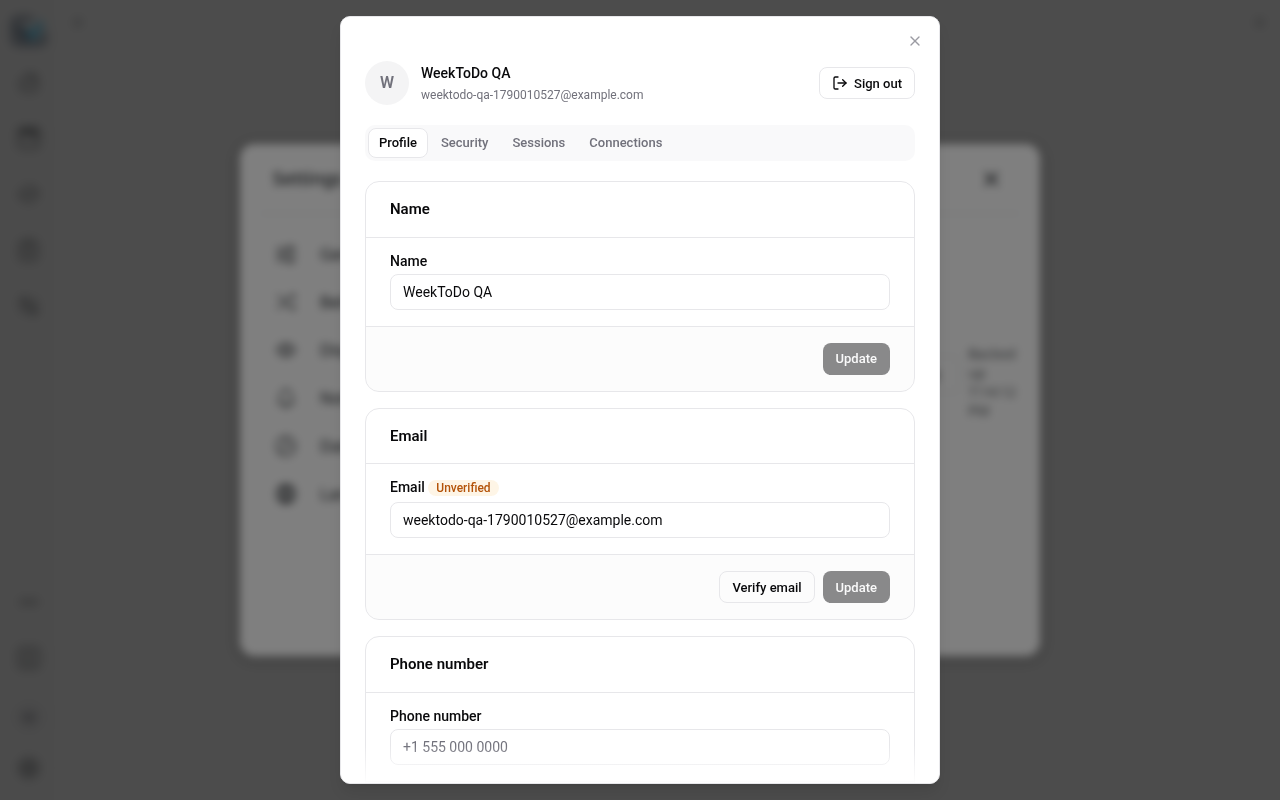
    <label class="form-check-label" for="account-btn">Account</label>
    <button
      id="account-btn"
      type="button"
      class="btn py-1 px-2 border"
      style="width: 140px;"
      @click="openAccount"
    >
      <i class="icons bi-gear mx-2"></i>
      Account
    </button>
  </div>
  <p v-if="status" class="px-1 small text-muted mb-0">{{ status }}</p>
</authui-show>
<authui-show> renders its children only for the matching state, so the Data tab shows either Sign in or the backup actions.
In the same file's <script>, import the helper and add the methods. Reuse WeekToDo's existing import path by writing a temporary .wtdb through the same IndexedDB/localStorage writers exportTool already uses. The smallest reliable approach is to download the JSON, then feed WeekToDo's import pipeline by writing the raw stores the same way exportTool's private importData does. Expose a thin wrapper on exportTool first:
// Add next to the existing default export methods:
importBackup(data) {
  importData(data);
  migrations.migrate();
},
importData and migrations are already in that module's scope. Then in configModal.vue:
import { AuthUI } from "@getauthui/core";
import { uploadBackup, downloadBackup } from "../helpers/appwriteBackup";
import exportTool from "../helpers/exportTool";

// inside data():
busy: false,
status: "",

// inside methods:
openSignIn() {
  AuthUI.open("sign-in");
},
openAccount() {
  AuthUI.open("account");
},
async backUp() {
  this.busy = true;
  this.status = "";
  try {
    await uploadBackup();
    this.status = `Backed up ${new Date().toLocaleTimeString()}`;
  } catch (err) {
    this.status = err.message || "Backup failed";
  }
  this.busy = false;
},
async restore() {
  this.busy = true;
  this.status = "";
  try {
    const data = await downloadBackup();
    let configModal = Modal.getInstance(document.getElementById("configModal"));
    configModal.hide();
    let importingModal = new Modal(document.getElementById("importingModal"), {
      backdrop: "static",
    });
    importingModal.show();
    exportTool.importBackup(data);
  } catch (err) {
    this.status = err.message || "Restore failed";
    this.busy = false;
  }
},
Import replaces local data the same way a .wtdb file import does, then reloads the page. That matches WeekToDo's own Import button.
Optional: account button in the sidebar
If you want a persistent trigger outside Settings, put an account control at the bottom of src/components/layout/sideBar.vue, above the gear icon. WeekToDo’s rail is icon-only (bi-* at 1.25rem with transparent padding until hover). The default <authui-user-button> Sign in state is a shadow-DOM primary pill, so it cannot match that rail from outside CSS. Use <authui-show> with a Bootstrap person icon while signed out, and keep the user button only while signed in (its avatar trigger is already circular and transparent):
<authui-show when="signed-out">
  <i class="bi-person" title="Sign in" @click="openSignIn"></i>
</authui-show>
<authui-show when="signed-in">
  <authui-user-button class="sidebar-authui"></authui-user-button>
</authui-show>
In the same file’s <script>, import Auth UI and open the sign-in modal (same helper as Settings → Data; sideBar needs its own copy):
import { AuthUI } from "@getauthui/core";

// inside methods:
openSignIn() {
  AuthUI.open("sign-in");
},
Center the signed-in avatar in the rail (no bulky margin). authui-show uses display: contents when ready, so the icon and button sit as flex children of .side-bar:
.side-bar > i,
.side-bar authui-show > i,
.sidebar-icon {
  font-size: 1.25rem;
  padding: 10px;
  margin-bottom: 9px;
  align-self: center;
  cursor: pointer;
  transition: 0.4s cubic-bezier(0.2, 1, 0.1, 1);
}

.side-bar authui-user-button.sidebar-authui {
  align-self: center;
  margin-bottom: 9px;
  display: flex;
  justify-content: center;
}
Try it

- Run
yarn serve, open Settings (gear) → Data, click Sign in, and create an account. - Add a task, click Back up. In the Console under Storage → backups you should see one file named after your user ID, with permissions for that user only.
- Open a private window (or another browser), sign in, click Restore. The page reloads with your lists and recurring tasks.
Where to go from here
- Back up on a timer. Call
uploadBackup()from a debounced watcher on Vuex mutations, or afterexportToolwould have written locally, instead of only on click. - Remember the last backup time. Store
savedAtfrom the snapshot inlocalStorage, or read the file's$updatedAtwithstorage.getFile()and show it under the buttons. - More sign-in methods.
methods: { emailPassword: true, magicUrl: true, oauth: ["github"] }adds passwordless and GitHub with no other UI changes. See Sign-in methods. - Match dark theme. WeekToDo toggles a
dark-themeclass on#app-container. Passbranding: { theme: "dark" }when that class is present, or leaveauto.
Caveats
- Local first by design. Without signing in, nothing leaves the device. Auth UI does not change WeekToDo's default privacy model.
- Not live sync. Two devices editing at once means the later Back up wins. Restore replaces local data. For continuous sync you would need conflict-aware replication (for example Appwrite Databases + an offline store), which is a larger change than this guide.
- Node 18+ and Webpack 4. Use
yarn install --ignore-enginesandNODE_OPTIONS=--openssl-legacy-provider yarn serveas in the first step. Without them, install fails on thenode-ipcengine range andyarn servedies witherror:0308010C:digital envelope routines::unsupported. - Vue CLI custom elements. Configure
isCustomElementonvue-loaderinvue.config.js. Settingapp.config.compilerOptions.isCustomElementinmain.jsdoes nothing with WeekToDo's runtime-only Vue build and leaves "Failed to resolve component: authui-*" warnings. - Web vs Electron.
yarn serveand a self-hosted web build talk to Appwrite like any SPA: register each hostname as a Web platform. Packaged Electron loadsapp://./index.html, which Appwrite Web platforms do not accept as a hostname. Electron development (yarn electron:serve) uses the webpack dev server onlocalhost, so that path works with the same platform you already added. Shipping Auth UI inside a packaged desktop build needs a custom protocol strategy or a hosted web shell; treat that as a follow-up. - OAuth redirects. If you enable OAuth, add every success and failure URL Appwrite will redirect to (for local work,
http://localhost:8080). Auth UI cleansuserIdandsecretfrom the address bar after the exchange. - CORS and CSP. The Appwrite endpoint must allow your origin. If you set a Content Security Policy, allow
connect-srcto your Appwrite host and keep the critical CSS above (or see Security notes). - Offline. The planner works offline. Sign in, back up and restore need a network connection because the Auth UI bundle and Appwrite API are remote.
This guide follows the happy path. Restore uses WeekToDo's existing import, which clears local stores and reloads. Keep a manual Export first if you want a file you can undo with.